We know that sometimes starting out can be the hardest step. So, to make things as smooth as possible when you’re first setting out on your Sendible journey, we wanted to put together all of our information on setting up new users so that you can be on the road to success in less time than it takes to put one foot in front of the other.
Sendible’s social media management software allows you to easily add multiple user accounts with different user permissions as well as the ability to create hierarchies which mirror your organization's structure.
What better place to start than at the beginning? So to add a new user to your account, just select the ‘My Users’ tab and then click ‘New User’.
When you’re setting up a new user, you’ll need to create the login details for them and also choose whether you want them to act as an Administrator, a Team Member or a Client.
The differences between these types of accounts are:
- Team Member - Team members in the same user hierarchy, by default, have access to each other's accounts to collaborate on tasks. They do not have access to admin features, these include setting permissions, billing, changing company information etc.
- Admin - Admins have access to all user accounts, meaning that they have the option to switch over to any other account at any time, change settings, set permissions, billing etc.
- Client - Client-type accounts are designed to be used by your client. They do not have access to any other account by default, only their own, unless specifically given access to other accounts using the 'Also has access to' option or by selecting the client under the 'Managed by' field of the user account you want to give them access to.
You can also set up hierarchies for users if you want a certain user to be able to manage a set number of accounts and not others.
It doesn’t matter whether the account you want to have to manage another user’s account is an Administrator account, a Team Member account or a Client account.
But, not every user needs to access all functionality. With our custom user permission groups, you can decide who gets access to what.
For example, you might want to charge your clients more if they want to add more profiles or build custom reports.
You would set this up as follows:
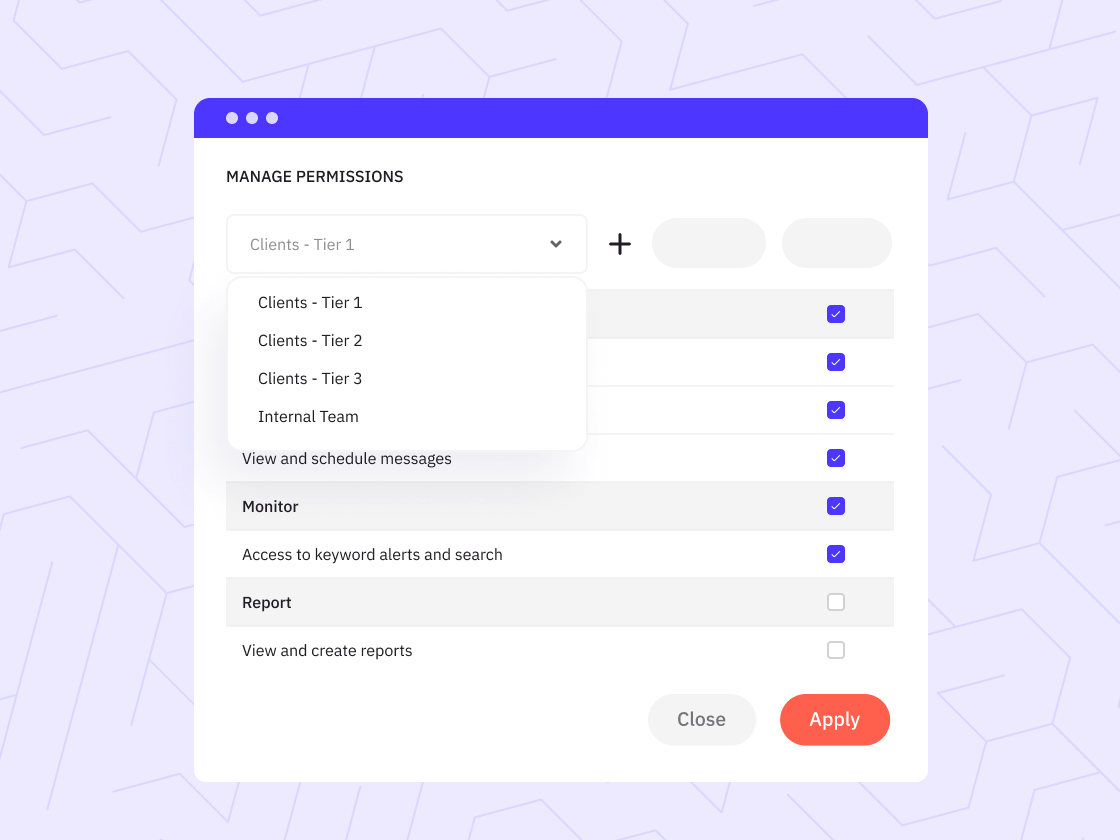
- Click on the Username on the top right-hand side of any page and then select Manage Users in the menu.
- Select Permissions from the menu to the right-hand side of the screen.
- Click on the + icon to set up a new group of Permissions.
- Give your Permissions Group a name. This can refer to the type of users those permissions will be applied to such as ‘Content Writers’. Once you’ve given your group a name, click the Create Group button.
- You can select the option to Rename or Clone a Permissions Group by selecting the More option.
- You can also Delete a Permissions Group by clicking on the bin icon. When deleting a Permissions Group you receive a warning box asking you to be sure you want to completely delete the Permissions Group.
- You can use the Select All option to set the permissions options to all available, or completely deselect the currently chosen settings.
- Click on the box to the left of a Feature or Dashboard Area to make it available or unavailable. Ticked options mean that users who have this Permissions Group applied will have access to those options. If the option is unpicked, they will not be able to access that feature or area of the Dashboard.
- In this example, the "Client" Permissions Group cannot View & Create Reports nor can they work with Profiles, but they are able to view and engage with the Priority Inbox and Social Feeds. A user who has this Permissions Group applied cannot View or Create Reports.
- When you’re happy with the settings for that Permissions Group, select the Apply button.
- To apply this Permissions Group to a particular user select Edit on the user from the User List.
- Select the Permissions option and then the new Permissions Group you created.
- Once selected choose the option to Update User.